I'm working on another version of the vintage Simplicity 1577 dress. This time I'm making it sleeveless. I really should move on to a different pattern, but I adore the pocket treatment in this pattern.
Anyway, I'm sewing the dress in seersucker and have lined it fully in cotton. The raw edges of the seersucker are a mess, so I decided to do some seam finishing beyond pinking the edges over a trash can.
I used this tutorial from the Slapdash Sewist to clean finish the bodice. It is totally amazeballs. Seriously. I loved how nice and smooth the interior of the bodice was so then I did french seams on the sides. Which was a little bulky but will press out. Of course once I had done all that, I decided to do a french seam to attach the bodice to the skirt. Then came the agony and madness of french seams (which I always mentally calling "frenching" and end up giggling a little).
My friend Jan taught me how to do french seams several years ago when I decided to sew a costume kimono out of silk brocade. The fabric instantly started raveling and I was frustrated (and covered in bits of poly silk thread). Jan rescued me with the revelation of doing french seams to completely enclose the raw edges. She had worked in a fabric store at one point where her manager was very insistent on the matter of frenching (HAH) seams.
Anyway, I haven't owned pinking shears for maybe 10 years (which is tragic) so my seams have either been entirely unfinished and sloppy or carefully done french seams.
I know opinions are split on "clean finishing" techniques. Should the inside should be as beautiful as the outside? Are simpler finishing techniques like pinking the seams just as fine? It's good to have lots of information about techniques. I especially love bloggers who provide detailed tutorials with photographs. Thank you thank you! That said, in the end I'm going to go with what works for me and in some cases it's which technique will annoy me less.
The thing about french seams is that while I really love them in theory, in practice they often drive me crazy. Inevitably either on the longest seam or the fiddliest (sometimes on both!) I will mess up which sides are sewn together first. This leaves with me two options: 1) rip out the seam and redo so it's properly enclosed 2) say "fuck it", run a seam that is at the proper 5/8" and then pink along the raw fabric.
The likelihood of not starting my french seam correctly increases exponentially as the length of the sewing session increases. And yet, I keep on going "just one more seam and then I'll go to sleep. Just one more seam..." And that next seam will of course be botched and need to be redone.
The waist band seam on my dress is likely to be pinked in the morning. I also realized in my "just one more seam" enthusiasm I forgot a minor detail....a side zipper. Hopefully I can wriggle in and out of the dress without it.
Tomorrow I'll show some pictures of the dress on the form, and plan my next garment. I'm thinking of doing a skirt or dress with stripes as part of the design. Stripes forming chevrons, etc. Or I might be sensible and cut a dress with 3/4 length sleeves for the coming fall and winter of coldness.
Saturday, September 18, 2010
Monday, September 13, 2010
Vintage Simplicity 1577 Dress

This is my first try at sewing Simplicity 1577--a vintage dress pattern from 1956 (http://vintagepatterns.wikia.com/wiki/Simplicity_1577). The dress has kimono sleeves which I lengthened by about 2 inches, a gored skirt and two front pockets. I chose to do the collar in a contrast fabric. The dress is a plain cotton. The pockets are trimmed with nylon braid.
What is hilarious about this dress is that I added width to the pattern pieces based on my measurements/back of envelope measurements. However, I added too waaay too much ease and ended up taking it all in. If I had just measured the flat pattern pieces I would have realized I didn't need to do that fussing. Oops.
I discovered that altering the kimono sleeves was a bad idea. Because of my full bust, the longer sleeves ended up getting bunchy in the arm pits. It's not super noticeable in looking at these pictures, so I'm trying to be chill about it.
The one fit issue I did tinker more with was the width of the back of the dress. You may not be able to tell, but the dress kept on sliding off my shoulders. When I took the back in about 3/4" the dress fit much better and actually stayed put.
Monday, August 23, 2010
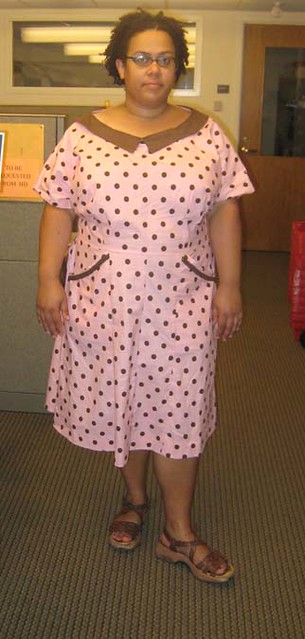
1930s Dress in Red Polka Dots

This is the first dress that I made from actual vintage pattern . It was also the first unprinted pattern I used, and my introduction to the joy of minimal instructions in vintage patterns.
This dress has pintucks along the front bodice and gathering along the yoke. It also has a pleat on the bodice back and pleats on the front and back skirt. The dress has patch pockets on the front with pin tucks which match the bodice. I sewed this up in cotton that is red with white polka dots. I wanted a dress that would be cool and comfortable.
The dress pattern is a reproduction of a 1930s dress pattern. The repro was created and sold by New Vintage Lady on etsy. Happily, the pattern came in a bust size that already fit, so I didn't have to do any futzing with the sizing.
Over all the dress fit together well. My biggest problem was the collar. The directions basically say "sew collar onto bodice" and I needed a little more direction than that. I ripped out the stitching 3 or 4 times (while cursing madly). I'm not sure that the collar is sewn in correctly, but it at least looks OK which is fine with me.
I was nervous about sewing button holes so I faked it. I figured out where the buttons should be on the front placket. Then I sewed snaps to the underside of the fabric, and buttons to the top. I also sewed a matching button to the top of each skirt pocket. I think I need to shift the buttons slightly to center them between the panels of tucking.
It's a great dress that I've got a lot of compliments on. I need to experiment with the styling. I think adding a belt would really improve the look. Also, I cut the dress too short for the proper 30s style. Letting them hem down at least another inch would add to the retro vibe


Thursday, August 19, 2010
First Post!
I plan to use this blog to talk about sewing, vintage fashion and fatness. Race, gender and sexual orientation will likely come up as well.
I think of myself as a relatively new sewist, because while I've been sewing costumes for years, I haven't made a lot of clothing for regular use. However, if I can sew myself elaborate historical dresses, I know I can also sew myself fabulous dresses for daily wear.
I'm fat which can sometimes make sewing frustrating because the variety of patterns one can buy dramatically shrinks when you get to plus sizes. My measurements are about 49-42-49 and I wear a modern 20/22. In vintage sizing I wear about a 24. For some reason, some pattern companies change their numbering for plus sizes. So they'll have a size 20, followed by a 40 (for 40" bust). My main fit issue is the bust. I always do full bust adjustments.
I'll be posting soon about some in progress items and some finished dresses.
Subscribe to:
Posts (Atom)